Are you an e-bike enthusiast looking to unlock the full potential of your Bafang powered e-bike? If you’re tired of being held back by speed restrictions or feeling like you are “peddling into a wall”, this blog post is for you.
In this blog, we’ll walk you through the process of removing the speed limiter from your e-bike’s Bafang motor using the Bafang E-mobility Sales & Service Tool (BESST) software.
Buckle up as we dive into the steps to supercharge your riding experience!
Why you should use this method over other unlock devices/methods
Most other tools like “Speed*”, “BadAss” boxes, “K5”, modified USB cables cause your speedometer to malfunction, need you to open your motor OR do not allow you to restore to original value.
Furthermore, BESST is the official Bafang tool for e-bike brands, dealerships and technicians. You can change the limit and also easily restore the original value. Hence, it’s my opinion that this a safer method which is also less likely to void your warranty.
How I unlocked my Bafang powered e-bike
If you still want to proceed on your own, I’ll take you through the process step-by-step.
Step 1: Obtain the Necessary Tools and Software
Before we begin, make sure you have the following tools and software components:
- A Banfang powered e-bike (I own a “Lekker Bikes Amsterdam GT”, with a Bafang
M420 mid-engine motor. - Bafang E-mobility Sales & Service Tool (BESST) - Purchasable from sources like
AliExpress. Mine was ~ $140.00 including shipping. - BESST Software Package -
This electron app is used to interact with the BESST tool. - mitmproxy - A tool to intercept and manipulate
network traffic. We will use this to spoof the Bafang API.
Step 2: Spoofing the BESST Login and auth flow
The BESST software package requires a login to access its features. Since Bafang’s software doesn’t implement HTTPS/TLS, it was easy to capture the API responses using mitmproxy.
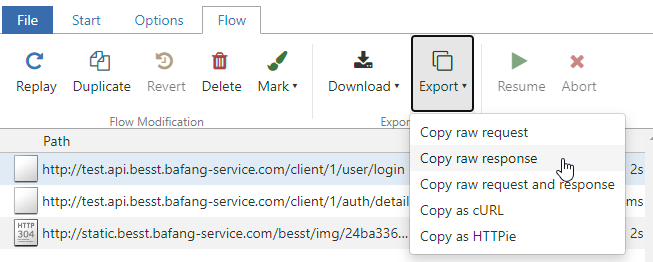
From the above authentication flow, we see only 2 API calls which need to be spoofed:
- First, a call to:
/client/1/user/login - Second an HTTP POST to:
/client/1/auth/detail
I captured these API responses so you don’t have to. Mitmproxy allows you to easily intercept and change an HTTP reply.
Hence, for any username/password combination, we can replay a successful authentication API response.
A simplified view of how that looks in Python (main.py in the repo below) is shown here:
    if flow.request.method == "POST":
        if flow.request.path == "/client/1/user/login":
            spoof(flow, Spoofed.login)

        elif flow.request.path == "/client/1/auth/detail":
            spoof(flow, Spoofed.auth)
I posted the full code and instructions for this solution to my GitHub:

Step 3: Setting Up Mitmproxy in a Docker Container
I’m a big fan of container workloads. Mitmproxy is already published on Dockerhub. This makes running mitmproxy with a script file in a container a breeze. It easy is to start the proxy on my local Windows 11 machine without installing any software (other than Docker) or Python dependencies. The Dockerfile looks like this:
FROM mitmproxy/mitmproxy

# set the working directory
WORKDIR /app

# install dependencies
COPY ./requirements.txt /app
RUN pip install --no-cache-dir --upgrade -r requirements.txt

# copy the scripts to the folder
COPY ./*.py .

# Start the server and pass in the
CMD ["mitmdump", "-s","main.py"]

# For development use the below to spinup the mitmproxy web interface to inspect
# HTTP calls and responses.
# CMD ["mitmweb", "--web-host", "0.0.0.0"]
To run the above container run this following command:
docker build -t mitmproxy . && docker run -p 8080:8080 -p 127.0.0.1:8081:8081 -it mitmproxy
The command you provided is a combination of two separate Docker commands that build and run a Docker container using the “mitmproxy” image.
Let’s break down each part of the command:
docker build -t mitmproxy .: This command is used to build a Docker image
using the Dockerfile located in the current directory (indicated by the dot.).- The -t mitmproxy flag specifies the name (mitmproxy) to be assigned to the
built image. The name is used as a tag to identify the image later.
- The -t mitmproxy flag specifies the name (mitmproxy) to be assigned to the
&&: This is a shell operator that allows you to run multiple commands
sequentially, where the second command is executed only if the first command
succeeds (returns a zero exit status). In this case, it ensures that the build
process succeeds before moving on to the next command.docker run -p 8080:8080 -p 127.0.0.1:8081:8081 -it mitmproxy: This part of
the command runs a Docker container based on the previously built “mitmproxy”
image. The -p flag is used to map ports between the host machine and the
container. In this case:-p 8080:8080maps port 8080 from the host to port
8080 in the container. This is used for communication to the mitmproxy.
-p 127.0.0.1:8081:8081maps port 8081 from the host’s loopback interface
(localhost) to port 8081 in the container. This is used for the webinterface
of mitmproxy. The-itflag allows you to interact with the container using
an interactive terminal session, which in this case means logs will show in
your terminal.
Step 4: Configuring the BESST Software
Make sure the container (from step 3) is running. Next, edit your BESST shortcut, configure it to use the mitmproxy as the proxy server by appending --proxy-server=127.0.0.1:8080 to the startup command.
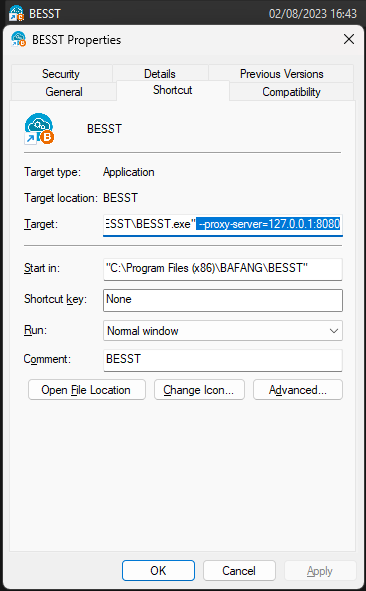
With the proxy in place, the BESST software will forward the login and authentication requests to the Mitmproxy. Thanks to our script, the software will now accept any username and password combination.
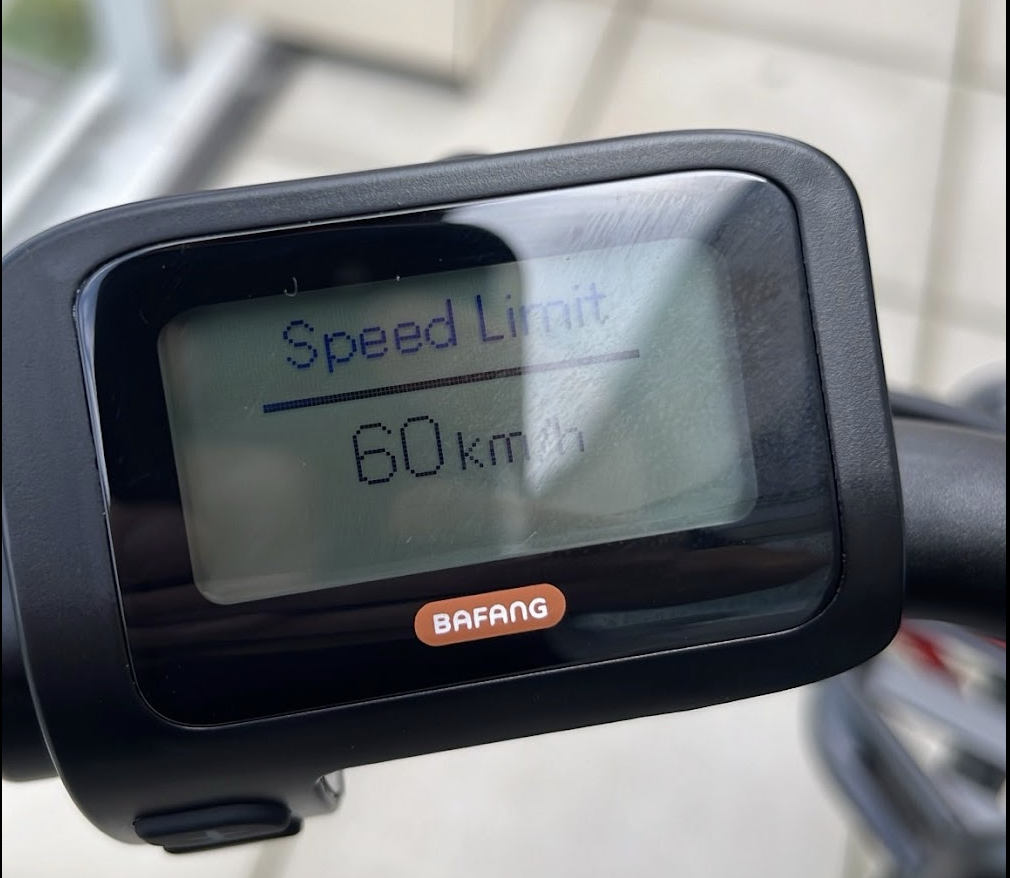
BESST Setup 1.2.18.exe.Step 5: Adjusting the Speed Limiter
Once you’ve successfully bypassed the login, you can use the BESST software to configure the speed limiter settings. For Both UART and CANbus versions motors, you can now increase the speed limit to up to 60 kph.
Conclusion
Congratulations! You’ve successfully removed the speed limiter from your e-bike, giving you the freedom to ride at higher speeds and experience a new level of excitement.
Keep in mind that modifying your e-bike comes with potential risks and legal considerations. Always prioritize responsible riding.